In the previous video we learned what makes Phoenix LiveView unique. Now let’s build a basic LiveView from scratch to see how to react to user events. This video is from our LiveView course, and all the steps are outlined below so you can easily recreate it yourself. 🏗
A Simple Light Controller
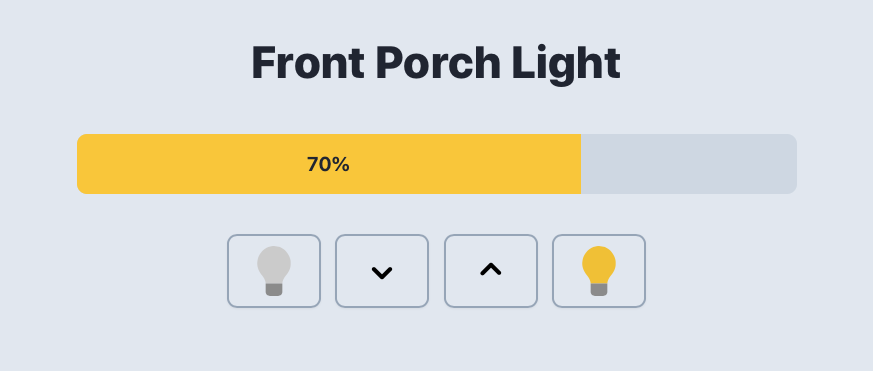
Building this simple light controller is a great way to get our feet wet with LiveView. It starts at 10% brightness. From there we can turn it off, turn it all the way on, or adjust the brightness until it’s just right. 👌
Create the Phoenix App
In the video above we started in a directory that already had a generated Phoenix app. To get to the same starting point, first create a new Phoenix app:
mix phx.new live_view_studio
Then change into the live_view_studio directory and set up the app:
cd live_view_studio

mix setup
Now you’re ready to fire up the Phoenix server:
mix phx.server
Then if you browse to http://localhost:4000 you should see the Phoenix welcome page. 🔥
Add a Live Route
Next we need a live route which we define using the live macro in router.ex like so:
scope "/", LiveViewStudioWeb do
  pipe_through :browser

  live "/light", LightLive
end
The live macro takes a path and a LiveView module to use. So in this case a request to /light gets routed to the LightLive module.
Let’s define that module…
Create a LiveView Module
By convention LiveView modules are kept in the live_view_studio_web/live/ directory. Create a light_live.ex file in that directory and then define the LightLive module like so:
defmodule LiveViewStudioWeb.LightLive do
  use LiveViewStudioWeb, :live_view
end
The use line injects some code that makes this module a LiveView.
Initialize the State
A LiveView module generally defines three callback functions:
-
mountassigns the initial state of the LiveView process -
handle_eventchanges the state of the process -
and
renderrenders a new view for the newly-updated state
Let’s start with the mount callback since it’s the first callback that’s invoked when a request comes in through the router:
defmodule LiveViewStudioWeb.LightLive do
  use LiveViewStudioWeb, :live_view

  def mount(_params, _session, socket) do
  end
end
The mount callback takes three arguments:
-
paramsis a map containing the current query params, as well as any router parameters -
sessionis a map containing private session data -
socketis a struct where the state of the LiveView process is stored
For this example we only need the socket argument, so we’ve ignored the others.
It’s in mount that we assign the initial state of the LiveView process. For example, we want the light to initially be set to a warm glow of 10% brightness. To do that, in mount we use the assign function, passing it the socket and a key/value pair to assign to the socket:
def mount(_params, _session, socket) do
  socket = assign(socket, :brightness, 10)
  {:ok, socket}
end
Calling assign this way returns a new socket struct with :brightness set to 10. And mount must return an :ok tuple with the new socket.
Rather than using the temporary socket variable you’ll often see it inlined like this:
def mount(_params, _session, socket) do
  {:ok, assign(socket, :brightness, 10)}
end
Notice we passed the key and value as separate arguments to assign, but if you had multiple key/value pairs you would pass a keyword list.
Render a Template
Next up we need to render the LiveView’s state, and we do that by defining the render callback:
def render(assigns) do
  ~H"""
  """
end
The render function takes assigns which is the map of key/value pairs we assigned to the socket in mount. The one-and-only job of render is to return rendered content, which we create using a LiveView template.
The ~H sigil creates what’s called a HEEx template, and it can render both static and dynamic content. For example, inside the template we can access the current brightness value using @brightness and interpolate it in an Embedded Elixir (or EEx) tag like so:
def render(assigns) do
  ~H"""
  <h1>Front Porch Light</h1>
  <%= @brightness %>%
  """
end
In this case we’ve inlined the template since it’ll be relatively short, but you could just as well put the template code in a separate file.
Now if you hop into the browser and go to http://localhost:4000/light, you should see the initial brightness of 10%.
OK, so mount assigns the initial state and render renders it. Easy, peasy. 😌
Render a Light Meter
Now let’s dress it up a bit by using the brightness value to display a light meter, kinda like a progress bar. We’ll use a span with a width based on the current brightness value:
def render(assigns) do
  ~H"""
  <h1>Front Porch Light</h1>
  <div id="light">
    <div class="meter">
      <span style={"width: #{@brightness}%"}>
        <%= @brightness %>%
      </span>
    </div>
  </div>
  """
end
One cool thing about the HEEx templating engine is that it’s HTML-aware and you get compile-time validation of the template structure for free. It’s super helpful!
And because HEEx templates are validated, we can’t use EEx inside an HTML tag such as when interpolating the style because using <%= %> wouldn’t be valid HTML. Instead, within HTML tags, Elixir expressions must be inside curly braces {}.
Finally, a splash of CSS is needed to bring the light meter to life and set us up for what comes next. To save you the trouble, go ahead and plunk this in at the bottom of assets/css/app.css:
#light {
  @apply mt-8 mx-auto max-w-xl text-center;
}

#light .meter {
  @apply mb-8 h-12 flex bg-slate-300 rounded-lg overflow-hidden;
}

#light .meter > span {
  @apply bg-yellow-300 font-bold flex flex-col justify-center text-slate-900 whitespace-nowrap transition-all duration-1000 ease-in-out;
}

#light button {
  @apply mx-1 py-2 px-4 border-slate-400 text-slate-700 font-medium border-2 rounded-lg transition ease-in-out duration-150 outline-none hover:bg-slate-300;
}
Out of the box, Phoenix apps are configured to use Tailwind CSS with no muss or fuss. Here we’ve used Tailwind’s @apply directive to apply Tailwind utility classes to specific elements, just so the CSS didn’t get in the way of learning LiveView. However, you could just as easily add these utilities directly to each element’s class attribute.
Make It Interactive!
Now let’s make it interactive by adding buttons to turn the light on and off. They’re part of the view, so they go in the render function below the light meter:
<button>
  Off
</button>

<button>
  On
</button>
When a button is clicked, we need to tell our LightLive process to change its brightness. We do that by sending an event using the special phx-click HTML attribute (it’s unique to LiveView) and its value is the name of the event to send. Because we’re wildly creative, we’ll have clicking the “Off” button send an off event and clicking the “On” button send an on event:
<button phx-click="off">
  Off
</button>

<button phx-click="on">
  On
</button>
LiveView refers to the phx-click attribute (and others like it) as a binding. It binds a click event to the button so when it’s clicked the event is sent via the websocket to the LightLive process.
Handle On and Off Events
Then to handle those inbound events, we need to define matching handle_event callbacks. We’ll start by handling the on event:
def handle_event("on", _, socket) do
  socket = assign(socket, :brightness, 100)
  {:noreply, socket}
end
The handle_event callback takes three arguments:
- the name of the event (
onin this case) - metadata related to the event, which we’ll ignore
- the
socketwhich, remember, has the current state of our LiveView assigned to it
To turn the light on we use assign to set the brightness value to 100. And then handle_event must return a tuple with :noreply and the new socket.
And whenever a LiveView’s state changes (in our case brightness changed from 10 to 100), the render function is automatically called to render a new view with the newly-updated state.
Then we also need a handle_event callback to handle the off event, which simply zeroes the brightness:
def handle_event("off", _, socket) do
  socket = assign(socket, :brightness, 0)
  {:noreply, socket}
end
And that’s all there is to reacting to user events. 👍
Dim the Lights
Now that we’ve got the hang of this, let’s add a couple more buttons to dim the lights down and up, which will introduce us to something new.
No surprise, these buttons emit corresponding down and up events:
<button phx-click="down">
  Down
</button>

<button phx-click="up">
  Up
</button>
Then we need to handle those two inbound events. The down event will dial back the brightness by 10 and the up event will bump up the brightness by 10.
To do that, the respective handle_event callbacks need to access the current brightness value. And since the socket struct holds the current state of a LiveView process, we can get the current brightness value using socket.assigns.brightness. So the handlers look like this:
def handle_event("down", _, socket) do
  brightness = socket.assigns.brightness - 10
  socket = assign(socket, :brightness, brightness)
  {:noreply, socket}
end

def handle_event("up", _, socket) do
  brightness = socket.assigns.brightness + 10
  socket = assign(socket, :brightness, brightness)
  {:noreply, socket}
end
That works, but there’s a convenient shortcut. When updating a value, we can use the update function, like so:
def handle_event("down", _, socket) do
  socket = update(socket, :brightness, fn b -> b - 10 end)
  {:noreply, socket}
end

def handle_event("up", _, socket) do
  socket = update(socket, :brightness, fn b -> b + 10 end)
  {:noreply, socket}
end
Notice that update takes a function as its third argument. That function receives the current key’s value (the brightness value in this case) and returns an updated value which is then assigned to the key in the socket. Thus, the value is updated.
You can make this more concise using the Elixir shorthand capture syntax:
def handle_event("down", _, socket) do
  socket = update(socket, :brightness, &(&1 - 10))
  {:noreply, socket}
end

def handle_event("up", _, socket) do
  socket = update(socket, :brightness, &(&1 + 10))
  {:noreply, socket}
end
For bonus points, you could limit how high or low the light can go by using max and min:
def handle_event("down", _, socket) do
  socket = update(socket, :brightness, &max(&1 - 10, 0))
  {:noreply, socket}
end

def handle_event("up", _, socket) do
  socket = update(socket, :brightness, &min(&1 + 10, 100))
  {:noreply, socket}
end
Now if you head over to http://localhost:4000/light, you should have a fully-functioning light controller. 💡
Summary
Stepping back, you gotta admit that’s a lot of functionality for such a minimal amount of code:
-
mountinitialize the state of the LiveView process by assigning values to the socket -
renderuses a LiveView template to render a view for the state in the socket -
handle_eventfunctions handle each inbound event by changing the state in the socket using eitherassignorupdate
And whenever the state changes render is automatically called to render a new view for the updated state. 🌀
It’s a fairly simple (and fun!) programming model, all written in Elixir. Not one line of custom JavaScript! But there’s more going on behind the scenes than meets the eye. And we’ll look at the lifecycle of a LiveView in more detail in the next video.
🔥 Learn LiveView In Depth!
We distilled everything you need to know about LiveView, assembled it in the right order, and neatly packaged it as a video course that's paced for experienced, gotta-get-it-done developers like you. 🙌