Gone are the days when you have to use external gems to handle file uploads in Rails. These days Active Storage is built into Rails with support for multiple cloud-based storage services such as Amazon S3, Google Cloud Storage, and Microsoft Azure. And in typical Rails style, the configuration is minimal.
If you want to see how to use Active Storage in a full-featured Rails app, check out our comprehensive Rails course. If you simply want to know how to get it working in your own app, this tutorial will walk you through the steps.
We’re going to arrange things such that in the development environment, uploaded images are stored on the local disk. But when the app is running in the production environment on a Heroku server, then the uploaded images are stored in an Amazon S3 bucket.
Install Active Storage
-
The first step is to install Active Storage by running the following in your Rails application directory:
rails active_storage:installThis simply copies a migration file into the
db/migratedirectory. -
Then run that migration:
rails db:migrate
You’ll see it creates two database tables: active_storage_blobs and active_storage_attachments.
Behind the Scenes: A Polymorphic Join Table
Although you won’t use these two new database tables directly, it’s always empowering to have a cursory understanding of what’s going on behind the scenes. So crack open the generated migration file and have a peek.
The active_storage_blobs table is fairly straightforward:
create_table :active_storage_blobs do |t|
  t.string   :key,        null: false
  t.string   :filename,   null: false
  t.string   :content_type
  t.text     :metadata
  t.string   :service_name, null: false
  t.bigint   :byte_size,  null: false
  t.string   :checksum,   null: false

  ...
end
It stores all the details of uploaded files including their filename, content_type, metadata, and other such information. And the key is an encoded value that points to the file in the Active Storage service.
The active_storage_attachments table is much more interesting:
create_table :active_storage_attachments do |t|
  t.string     :name,     null: false
  t.references :record,   null: false, polymorphic: true, index: false
  t.references :blob,     null: false

  ...
end
Each row of this table references a blob (a row in the active_storage_blobs table) and also references a record. In other words, each row of the active_storage_attachments table joins a blob and a record.
What’s particularly interesting about this join table is it’s a special type of join table: a polymorphic join table. You can tell because the polymorphic: true option is added to this line:
t.references :record, null: false, polymorphic: true, index: false
This means that the record it’s referencing can be any ActiveRecord model.
If the polymorphic: true option weren’t added here, then the migration would simply create a column named record_id which would contain a foreign key pointing to a record. But it wouldn’t know what type of record it’s pointing to! 😲
By adding the polymorphic: true option, the migration creates two columns: a column named record_id which contains a foreign key and a column named record_type which contains the name of an ActiveRecord model class. For example, here’s a polymorphic join table that joins an event to it’s uploaded image and a user to it’s uploaded image:
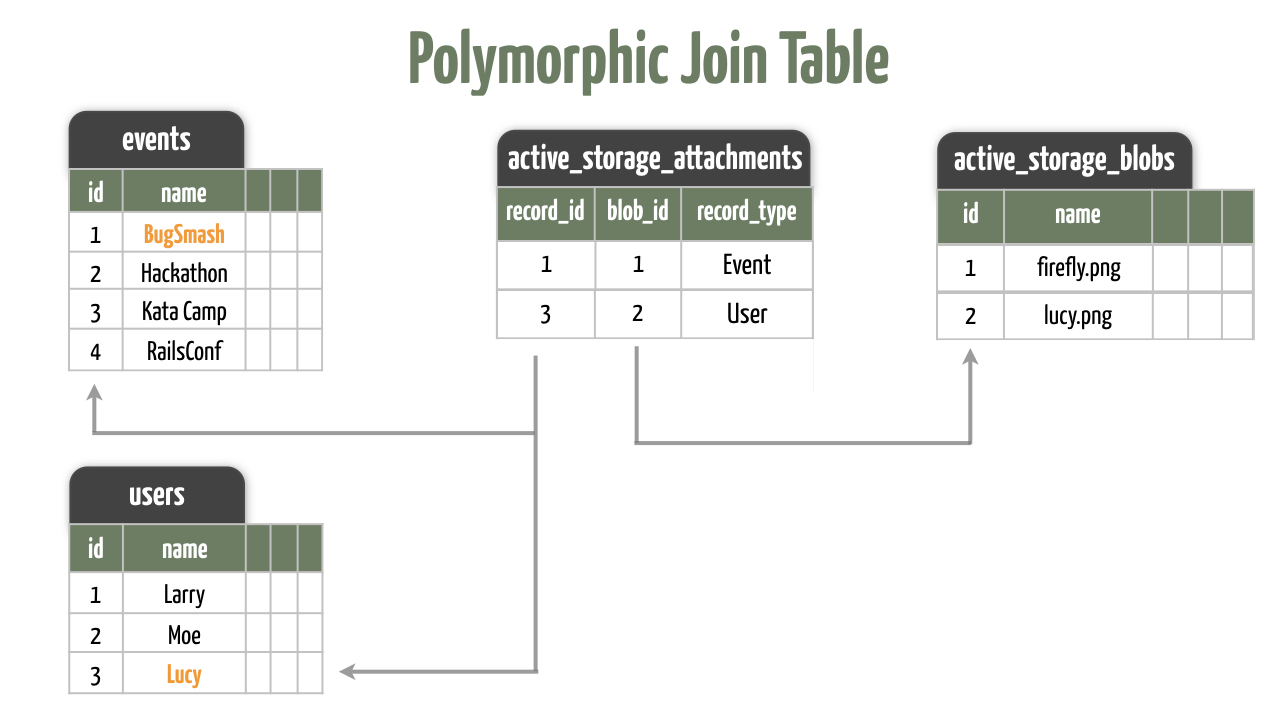
Notice the first row in the active_storage_attachments table has a foreign key pointing to the event and another foreign key pointing to the blob. It knows the record_id is a foreign key for an event, in this case, because the record_type column contains Event.
The second row in the active_storage_attachments table has a foreign key pointing to the user (because User is in the record_type column) and a foreign key pointing to the blob.
Here’s the takeaway: The active_storage_attachments table joins any ActiveRecord model to its images (or attachments) because it’s a polymorphic join table. So with these two pieces of information—a foreign key and a class name—the row knows exactly which record it’s referencing. 👌
Declare Attachment Associations
The database is now ready to join any ActiveRecord model to a blob (an uploaded image), but we still need to declare associations in our models.
Suppose, for example, we want our Event model to have one attached image—the main image for the event. To do that, we add a declaration in the appropriate model like so:
has_one_attached :main_image
The name doesn’t correspond to any database column name, so you can name the attachment anything you want. Here we’ve named it main_image. If you were attaching an avatar image to a User model for example, then you might name the attachment avatar.
So what does this has_one_attached declaration do? Well, using a bit of metaprogramming it effectively creates two associations like this:
has_one :main_image_attachment, dependent: :destroy
has_one :main_image_blob, through: :main_image_attachment
So our model has a main_image_attachment and a main_image_blob that it can get through the main_image_attachment association. If you look at the source code of the has_one_attached method, there’s a little more to it than that, but basically that’s what’s going on. It’s not magic!
Upload an Image
The model is now ready to accept an image attachment. To let users choose a file to upload from their computer, we need a form which includes a file upload input field, like so:
<%= f.label :main_image %>
<%= f.file_field :main_image %>
Be sure to use a file_field and reference the main_image attribute (or whatever you named yours). Also, for this to work, don’t forget to add main_image attribute to the list of permitted parameters in the controller that handles the form.
Now back in our app, we can use the form to select and upload an image!
Display an Uploaded Image
To display the image that’s attached to a model, we just need to use the main_image attribute of the model which in our case is an Event. For example:
<%= image_tag event.main_image %>
Find the Uploaded File
By default in the development environment, Active Storage stores all uploaded images on your local disk in the storage subdirectory of the Rails application directory.
If after uploading an image you drill down into that directory, buried under a few other subdirectories you’ll find a file whose name is the same as the blob key. It’ll be something obscure like 8x2jhtmb33u0kcsyrb9vmwf7gp0w:
your-app
└── storage
    └── 8x
        └── 2j
            └── 8x2jhtmb33u0kcsyrb9vmwf7gp0w
That’s the file you uploaded!
Add Validations
So what kind of files can users upload? Well, as things stand, there are no restrictions on the file type or its size. It would be foolhardy not to add some basic validations. Now you might think Active Storage would include built-in validations but that’s not the case. Thankfully it’s surprisingly easy to write custom validations.
Let’s say we want to restrict the image size 1MB or less and only accept JPEG and PNG files.
-
To do that, in the model we need to register a custom validation method. We’ll name it
acceptable_image:validate :acceptable_image -
Then we need to define that method. As a starting point, we only want our validations to run if a main image is attached. Otherwise, if one isn’t attached, there’s no need to run the validations. To check if a main image is attached, we can use the
attached?method like so:def acceptable_image return unless main_image.attached? end -
Next, to figure out if the uploaded image is too big (over 1MB), we can read the
byte_sizeattribute of themain_imageattribute:def acceptable_image return unless main_image.attached? unless main_image.blob.byte_size <= 1.megabyte errors.add(:main_image, "is too big") end endIn cases where the image is too big, we add a validation error to the
main_imageattribute with the message "is too big". -
Then to check if the uploaded image is a JPEG and PNG file, we can read the
content_typeattribute of themain_imageattribute:def acceptable_image return unless main_image.attached? unless main_image.blob.byte_size <= 1.megabyte errors.add(:main_image, "is too big") end acceptable_types = ["image/jpeg", "image/png"] unless acceptable_types.include?(main_image.content_type) errors.add(:main_image, "must be a JPEG or PNG") end endIf the
content_typeisn’t one of our acceptable types, then we add a validation error to themain_imageattribute with the message "must be a JPEG or PNG".
Consider those validations as bare minimums. You’ll want to think carefully about what types of files can be uploaded to your app, and what size you’re willing to handle. As an alternative to writing custom validations for image uploads, check out the Active Storage Validations gem which includes a variety of common validations you might want to perform.
Create Image Variants
Active Storage will always store unaltered copies of uploaded files. But sometimes you need to transform those image. For example, you might want to resize an uploaded image to generate a smaller thumbnail image. Active Storage has an answer for that: it can create something it calls a variant. It’s a variation of the original uploaded image. For example, an original image might be 300x300 pixels and have a thumbnail variant that’s only 150x150 pixels.
-
To generate variants for images, Rails uses the
image_processinggem. It’s not installed by default, so we need to uncomment the following line in theGemfile:gem 'image_processing', '~> 1.2'Then install it:
bundle install -
The
image_processinggem relies on ImageMagick to do the actual image transformation. ImageMagick isn’t a Ruby gem; it’s distributed as a binary that’s specific to your operating system. You’ll need to install it separately for your operating system:For Windows use the Windows binary release.
For Mac use Homebrew:
brew install imagemagickFor Linux use
apt-get:sudo apt-get install imagemagickThen once you have ImageMagick installed, you’ll need to restart your Rails app.
-
Now let’s suppose we want to display a thumbnail of the main image attached to an
Eventmodel object. We want the thumbnail to be 150 pixels on the long side. To do that, when displaying the image we just use thevariantmethod with theresize_to_limitoption, like so:<%= image_tag movie.main_image.variant(resize_to_limit: [150, nil]) %>The
resize_to_limitoption will downsize the image to fit within the specified dimensions while retaining the original aspect ratio. To resize it to a 150x150 square, you can use[150, 150]. Of if you just want to resize one dimension, you can set the other dimension tonil, such as[150, nil].
You can have as many image variants as you like, and they’re automatically
created and stored when requested. If you drill down into the storage directory you’ll find all the variants under the va/ri/variants directory. Each image’s variants are stored in a separate subdirectory whose name is the same as the image blob key, such as 8x2jhtmb33u0kcsyrb9vmwf7gp0w:
your-app
└── storage
    └── va
       └── ri
           └── variants
               └── 8x2jhtmb33u0kcsyrb9vmwf7gp0w
                   └── 2e4037f1976861d1536a0e5c772f7d
Encrypt Your Credentials
We’re almost ready to turn our attention to uploading files to a cloud-based storage service when running in the production environment, but first a bit of setup is needed. All of the cloud-based storage services supported by Active Storage require a set of credentials. Here’s the rub: those credentials are super-secret! If they were revealed, someone could hijack our account and run up our storage bill. 😳
To avoid that, we need Rails to encrypt our Amazon S3 credentials in a special file that gets deployed with the application. Then when the application runs, it will decrypt that encrypted file and use our credentials to communicate with Amazon S3.
Let’s set that up…
Create an AWS Account and an S3 Bucket
First you’ll need to create and activate an Amazon Web Services account if you don’t already have one. The free tier offers sufficient storage space for learning purposes.
Access to S3 is governed by a set of credentials: an access key id and a secret access key. The access key identifies your S3 account and the secret access key should be treated like a password. Your S3 credentials can be found on the Your Security Credentials section of the AWS console.
All files in S3 are stored in buckets which act basically like
directories. Create an S3 bucket where your uploaded images will be stored. You can name the bucket anything you want, but the name must be unique across the entire Amazon S3 system. For example, if your app is named quiet-thunder on Heroku then you might name your bucket quiet-thunder-images.
Encrypt Your Access Keys
Now we’re ready to encrypt our secret access keys in a file that the Rails app can decrypt when its running. To do that, first run:
rails credentials:edit
This will open a temporary file in your default editor. It uses the value of the EDITOR environment variable to determine your default editor. If nothing happens, you can set the EDITOR variable when running the command. For example, if VS Code is your preferred editor, then run:
EDITOR="code --wait" rails credentials:edit
The --wait option prevents the command from exiting immediately. It waits until you’re done editing the credentials and you’ve closed the file.
Once the temporary file opens you’ll see all the credentials in plaintext. Uncomment the following section, and replace the values of both keys with your AWS access keys:
aws:
  access_key_id: your-access-key-id
  secret_access_key: your-secret-access-key
Here comes the semi-magical part: Save the temporary file and close it in your editor. Doing that causes the contents of the temporary file to be encrypted and written to the config/credentials.yml.enc file. If you open up that file, you’ll see it’s total gibberish. That’s the result of good encryption.
So config/credentials.yml.enc is obviously an important file. But on its own, this file is useless. To unlock the secrets held within that file, you need a master key.
Where’s the master key? You guessed it: in the aptly-named config/master.key file. This file was generated when you initially generated the Rails app. And if you look inside, you’ll see a master key that unlocks the secrets of your app!
If you ever want to generate a new master key, you can run
rails secret
And then you’d copy the resulting key into the config/master.key file.
⚠️ Super Important Warning!
Under no circumstances should you store the config/master.key file in your Git repo. Otherwise anybody with access to that repo could unlock your secret credentials. Rails helps prevent that by generating a .gitignore file that ignores the config/master.key file.
You will, however, need to share the master key with your development team. Just be careful how you share it! Your best bet is to put it in a password manager such as 1Password that your team can access.
How Does Rails Access Those Credentials?
And if you look in the generated config/storage.yml file, you’ll see that the Amazon S3 storage service is configured like this:
amazon:
  service: S3
  access_key_id: <%= Rails.application.credentials.dig(:aws, :access_key_id) %>
  secret_access_key: <%= Rails.application.credentials.dig(:aws, :secret_access_key) %>
So when the application runs, values for access_key_id and access_key_id are substituted in using Rails.application.credentials.dig.
To see how that works, hop into a Rails console session and give this a whirl:
Rails.application.credentials.dig(:aws, :access_key_id)
The result should be the value of the access_key_id you typed into the temporary file.
Then try this:
Rails.application.credentials.dig(:aws, :secret_access_key)
No surprise, this time the result should be the value of the secret_access_key you typed into the temporary file.
When you call Rails.application.credentials, the master key is used to unlock and return the credentials in the encrypted credentials file. Then you can use the dig method to “dig down” into those credentials and extract a specific value under a given sequence of keys. Dig it?
Quick Summary
The takeaway is there is one and only one way to add or edit credentials needed by an application, and that’s by running:
rails credentials:edit
In this way, all secret credentials for an application are stored in an encrypted format in the config/credentials.yml.enc file using the master key contained in the config/master.key file. And you never want to store that file in a Git repo!
Up, Up, and Away!
Now we’re ready to store uploaded images in the cloud in production! ⛅️
-
In the production environment we’ll use the storage service named
amazon. Start by uncommenting that service in theconfig/storage.ymlfile and setting yourregionand the name of thebucketwhere you want uploaded images to be stored:amazon: service: S3 access_key_id: <%= Rails.application.credentials.dig(:aws, :access_key_id) %> secret_access_key: <%= Rails.application.credentials.dig(:aws, :secret_access_key) %> region: us-east-1 bucket: your-bucket-name -
Then we need to configure Active Storage to use the
amazonstorage service when the application is running in the production environment. To do that, inconfig/environments/production.rbswitch the ActiveStorage service fromlocaltoamazon:config.active_storage.service = :amazon -
When the application runs in production on a Heroku server, the app needs to read our Amazon S3 credentials which are encrypted in the
config/credentials.yml.encfile. And to decrypt that file, the app needs our master key.But remember, the
master.keyfile won’t be in our local Git repo. So when we push changes from our local Git repo to the remote Git repo on Heroku, themaster.keyfile won’t go along for the ride. Instead, we have to set the master key in a Heroku application-level configuration variable namedRAILS_MASTER_KEY.To do that, use the
herokucommand like so:heroku config:set RAILS_MASTER_KEY=12345678Yup, you need to replace
12345678with your application’s master key. 😉When the app is deployed, Rails will first look for the master key in a
config/master.keyfile. And when it doesn’t find that file, Rails then looks for the master key in theRAILS_MASTER_KEYvariable.When you set a Heroku config variable, behind the scenes an environment variable is set. So if you’re running on a non-Heroku server that you have privileged access to, then you can simply set the
RAILS_MASTER_KEYenvironment variable.Another way to provide the master key to a non-Heroku server is to ssh the
master.keyfile to a privileged directory on the server (for example ashareddirectory), and then create a symbolic link to themaster.keyfile when the app is deployed. -
Since we’ll be storing images in an Amazon S3 bucket, we need to install the AWS gem by dropping this into the
Gemfile:gem "aws-sdk-s3", require: falseAnd install it:
bundle install -
Now we can commit the changes to our local Git repo and push them to the remote Git repo on Heroku, which re-deploys the app:
git add . git commit -m "Use Active Storage" git push heroku master -
Finally, we need create the Active Storage database tables in the database that’s running on the Heroku server. The deployed code already has a migration file that creates those tables, so it’s just a matter of applying that migration to the production database:
heroku run rails db:migrate -
And now you should now be able to upload images to your production app and the image files will be automatically stored in S3.
Given what you now know, it’s pretty straightforward to store uploaded files in any of the supported storage services!
"I Can Now Build Pretty Much Anything in Rails!"
This is what folks say after taking our step-by-step Ruby on Rails course. The same can be true for you! Once you understand how all the pieces fit together in a full-featured app, you can build whatever you want with Rails.